February 10, 2017
This is the first in a series of security/penetration testing/ethical hacking articles. It won’t be super technical and should be easy to follow for most people, but if you’re stuck anywhere just shout in the comments and i’ll do my best to help.
Introduction
A short while ago, Google and Mozilla announced that they would be starting to show more prominent warnings in Chrome and Firefox when visiting sites over HTTP and not HTTPS, particularly if those sites ask for passwords or credit card details.
This is because any data that you send to a server over HTTP is sent “in the clear” and not encrypted like it is over HTTPS. These extra warnings are great and it’s another step towards encouraging the use of HTTPS everywhere.
However, following the related submission on Hacker News there was a discussion by some users about being “forced” into implementing HTTPS for their sites (to avoid the new warnings) and a lack of awareness of the security implications of using plain HTTP. “Isn’t intercepting somebody’s traffic on the way to a server a bit far-fetched?”
No. Intercepting somebody’s traffic using a Man In The Middle attack doesn’t involve state sponsored hackers, wire taps or voodoo - it’s actually very simple… and over the next few series of posts I’m going to show you just how easy it is, the types of things an attacker could do as a result, and finally, how you can protect yourself from this kind of attack.
When are you at risk of a MITM attack?
For a MITM attack to take place, the attacker and the target need to be on the same network. We’re not going to cover breaking into WIFI networks (maybe in a future post) but this covers the use case for whenever you’re on a network you don’t fully control - for example, free wifi at the airport, your favourite cafe you like to “work from home” at, hotels, or even when you’re at work.
For most people, that means pretty much every network outside of their own home. Which is why you should never trust a network that isn’t yours… ever.
The network itself might be entirely malicious. The
Airport Free WIFIyou just connected to could just be somebody sat in departures with a laptop and a wireless card. All the traffic you send/receive through it is vulnerable, the attacker is already physically the MITM in this case and can see any of your unencrypted traffic as it passes through.Even if the network is “genuine”, whoever is operating it could still configure the router to log everything going through it. You would need to trust the network owner not to do anything nefarious with this data.
Even if you’re connected to a genuine network and you implicitly trust the network owner, anybody else that is connected to that same network can still intercept all of your traffic anyway!
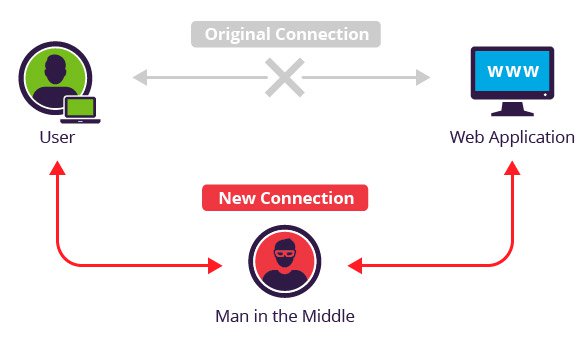
Wait… so any user on the same network as me can see all the traffic that I send to the router (and onto the internet)? Not by default, no, but an attacker can force your traffic to be re-routed through them before it gets to the router and onto its final destination.
This now makes them the MITM - you would be sending all of your internet bound traffic to them and you’d be none the wiser as they will be silently forwarding your requests onto the router and then the responses back to you, as per usual.
ARP Poisoning
The Address Resolution Protocol (ARP) maps a network address (IP) to a physical device/hardware address, also known as a MAC address. Every network device (computers, smart phones, routers etc) has this unique 48bit MAC address which is allocated when its manufactured - e.g 0:80:c8:f8:4a:51.
If a device wants to send data (packets) to another IP address on the local network, it needs to know its MAC address. It will first look in its local ARP cache to see if it already knows the MAC address for that IP, and if it doesn’t have an entry for it it will then broadcast an ARP request onto the network that everyone receives, asking for the MAC address. If a device receives this ARP request and it hosts the IP address that’s requested, it will send back an ARP reply with its MAC address.
Here’s an example tcpdump showing a device pinging another IP address on the LAN:
0:80:c8:f8:4a:51 ff:ff:ff:ff:ff:ff 42: arp who-has 192.168.99.254 tell 192.168.99.35
0:80:c8:f8:5c:73 0:80:c8:f8:4a:51 60: arp reply 192.168.99.254 is-at 0:80:c8:f8:5c:73
0:80:c8:f8:4a:51 0:80:c8:f8:5c:73 98: 192.168.99.35 > 192.168.99.254: icmp: echo request (DF)
0:80:c8:f8:5c:73 0:80:c8:f8:4a:51 98: 192.168.99.254 > 192.168.99.35: icmp: echo reply
- The device with MAC
0:80:c8:f8:4a:51sends a broadcast to everyoneff:ff:ff:ff:ff:ffwith the request:arp who-has <THIS_IP> tell <MY_IP>. - The device with MAC
0:80:c8:f8:5c:73then responds with:arp reply <THIS_IP> is-at <MY_MAC>with its MAC address. - The first device can then send the ICMP echo request (ping) to that address.
After a reply, the device will also save the 192.168.99.254 - 0:80:c8:f8:5c:73 mapping to its local ARP cache so it doesn’t have to keep broadcasting ARP requests in the future for that IP address.
This is the same for packets bound for an IP address out on the internet, but in this case your device will know that the IP address isn’t local and will request the MAC address for the default gateway (usually the router) so the packets can be sent there for it to deal with.
You might have already started to realise where this is going. ARP Poisoning, also called ARP Spoofing, is the process where an attacker abuses ARP to cause a target device to start sending its internet bound packets to the attacker’s MAC address instead of the router’s.
From the ARP wiki article:
Because ARP does not provide methods for authenticating ARP replies on a network, ARP replies can come from systems other than the one with the required Layer 2 address.
To put it simply, an attacker can send unsolicited ARP replies to a target (without the target making an initial ARP request) saying: “Hey! The router is now at this MAC address, send it all your internet traffic!” and the target goes “Oh cool, thanks!” and updates its ARP cache accordingly. From now on, whenever the poisoned target device sends out packets bound for the internet (via the router), it’s actually sending them to the attacker’s MAC address and those packets can now be analysed by the attacker.
After sniffing the packets, the attacker can simply drop them causing a denial of service for the target, or forward them onto the actual router (and the responses back to the target), leaving the target with uninterrupted service and being completely oblivious as to what’s happening.
We’re going to carry out exactly this type of attack in a test environment so we can see it in action.
Set up the test lab
We’ll need a test network and a couple of test machines to play with - the attacker and the target. We’re going to be using a couple of virtual machines for this with VirtualBox, as not only is it free, it’s simple to use… however, you can use whatever VM software you like. So once we have that installed, it’s time to sort out our individual machines.
The Attacker
Our attacker’s machine is going to be Kali-Linux based. Kali is a Debian derived Linux distribution specifically aimed at penetration testing and comes with loads of useful programs and tools pre-installed for us.
You can download the latest VirtualBox VM image for Kali here - Kali Linux 64 bit VBox, from under the VirtualBox Images tab. I’m assuming your operating system is 64bit, if not make sure you download the correct version for your OS. Once you have downloaded the image you can import it into VirtualBox with File > Import Appliance. It will take a few minutes to do the import.
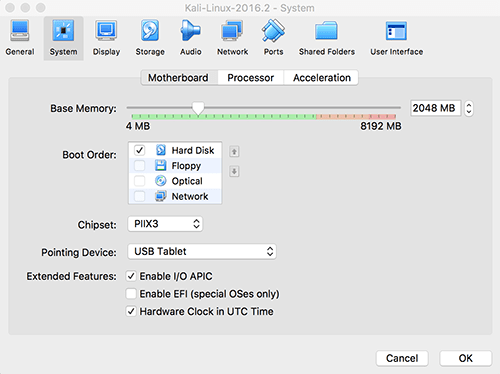
Allocating the machine 2GB of RAM should be sufficient. You can do this whilst doing the initial import or afterwards by right-clicking the machine in VirtualBox, selecting Settings and then heading to the System tab:
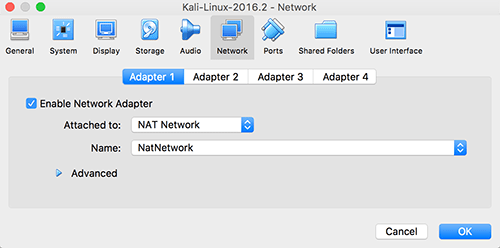
You will also need to enable the NAT Network under the Network tab so this machine (and the target machine) are connected to a virtual network and will be able to reach each other:
You should now be able to start the machine and log in with the default user root and the default password toor.
If you haven’t used Kali before now would be a good time to have a poke around and familiarise yourself with where the basics are. Don’t worry if you’re not much of a linux user, we’ll be going over things step by step whenever we’re using any of the tools in Kali.
The Target
Our target machine can be anything, but we’ll go ahead and use a Windows based one seeing as its the most common operating system. Microsoft makes VM images of Windows available for the purposes of testing their Internet Explorer and Edge browsers. They are free, fully functioning images that expire after 90 days. Download the latest Win 10 Stable image for VirtualBox here and import it just the same as you did before with Kali.
Using 2GB of RAM for this machine should also be fine, and the network settings need to be the same as your Kali machine, with the NAT Network enabled.
We should now have both machines ready and have given them a quick boot to make sure they’re working as expected - internet connectivity and general performance, etc.

Coming up next
So, now we know that our internet traffic can be very easily intercepted by a so called Man In The Middle on any network that we don’t control - either by the network owner/operator, or indeed by any other user of the network using something like ARP poisoning to re-direct our traffic to flow through them.
We also have our test lab set up with a virtual attacker and target, ready for us to practice our MITM attacks with.
In part 2 of this series we’ll be using our attacker to do some simple network discovery and become the MITM, then we’ll learn how to use a variety of tools to analyse our target’s traffic and steal usernames and passwords. We’ll also start to explore other things we can do as the MITM, such as injecting javascript into our target’s web-pages, spoofing web-pages entirely and loads of other “fun” stuff.